How to Turn Off Automatic App Updates in iOS 7
Oct 27, 2013 - Leave a Comment
 Automatic Updates is a feature that came along with iOS 7 which allows updates to installed apps to download and install themselves, allowing for a very hands-off approach to the app updating process. For many users this is a good thing to leave on, since it takes the hassle out of updating and managing your apps, and you’ll only have to use the App Store to download new apps instead. But automatic updates are not always a desirable feature for all users for a variety of reasons, whether you’re trying to squeezes maximum performance out of a device, reduce overall network bandwidth used by an iPhone or iPad, or perhaps you’d just prefer to control the app updating process yourself. If you’d rather have apps not update themselves in the background, you can take a moment to turn the feature off.
Stop Apps Updating Themselves Automatically
- Open Settings and go to “iTunes & App Store”
- Scroll down to the “Automatic Downloads” section
- Toggle “Updates” to OFF to stop apps automatically updating
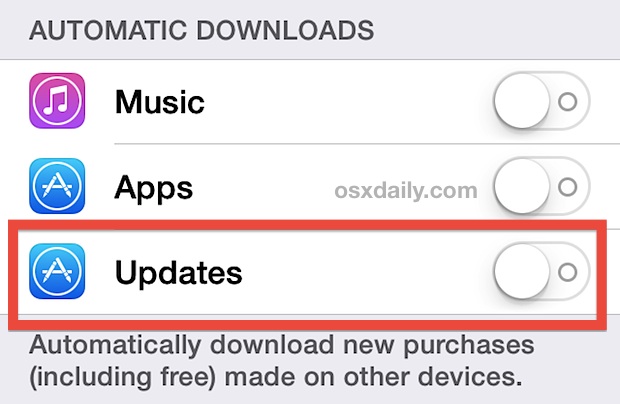
That’s it, no more automatic app updates, no more surprises when opening apps to find things have changed. Remember, with this feature turned OFF you will need to use the App Store to handle updates yourself, similar to how it was done in the past with all iOS releases pre-7.0.
Turning off Automatic Updates has a few additional side benefits too; it can helpincrease battery life, and it can also help to speed up iOS 7 equipped devices a bit, particularly older models. Both benefits are a result of reducing background activity and resource usage, and though the newest model iPhone and iPad devices may not notice them quite so much, they can still offer a nice increase to performance all around.
Use Automatic Updates from Wi-Fi Only
If you’d prefer to leave automatic updating on for wi-fi only while preventing it from happening over a cellular data connection, you can do that too with a simple adjustment within the “iTunes & App Store” settings: simply keep Automatic Downloads “Updates” toggled to ON, but toggle “Use Cellular Data” to OFF. Unless you have an unlimited cellular data plan with your iPhone or iPad, it’s probably a good idea to keep cellular data updating completely off.
Will this Stop the Random Blue Dots Next to App Names?
Yes, this will stop the blue dot from randomly appearing next to app names on your iOS home screen. For those who weren’t aware, the blue dot is an indicator that an app has been updated, or that an app is new to the device, but it has also caused a ton of confusion for many users who wonder why on earth a mysterious blue dot seems to show up alongside app names for seemingly no apparent reason.

Turning off automatic updates will prevent it from showing up at random, and instead the blue dot will only appear when you have updated an app yourself, or downloaded something new from the App Store. You can not disable the blue dot completely.
By Paul Horowitz - iPad, iPhone, Tips & Tricks - Leave a Comment
How to Hide the Menu Bar on External Secondary Displays in OS X Mavericks
Oct 27, 2013 - Leave a Comment
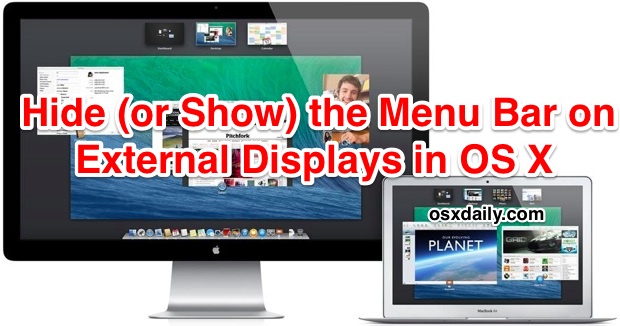
For Mac users who use external screens, multi-display support has been greatly improved in OS X Mavericks, but one feature that is either loved or hated is the addition of the secondary menu bar that is visible on the external display(s). The secondary menu bar serves the obvious purpose of providing easy access to menu items, but it also functions as an active focus indicator, letting you know which of the multiple displays has the currently active focus for windows and the mouse cursor. When one screen is active, the menu bar on that display will be shown at normal brightness, whereas the display that does not have focus will show a dimly faded translucent menu bar, as shown in this screen shot:

OS X provides a setting to hide the external display menu bar (or show it, if it’s hidden for some reason) if you don’t like it and the whole dimming indicator thing, though the wording of the setting doesn’t offer much hint that it has anything to do with menu bars or secondary screens.
Disable the Menu Bar on External Displays in OS X Mavericks
This will remove the menu bar from the external display completely, including the translucent display focus indicator:
- Open System Preferences from the Apple menu and choose the “Mission Control” preference panel
- Uncheck the box next to “Displays have separate Spaces”
- Log out and log back in to the user account for the change to take effect (or reboot, but logging out and back in is usually much faster)
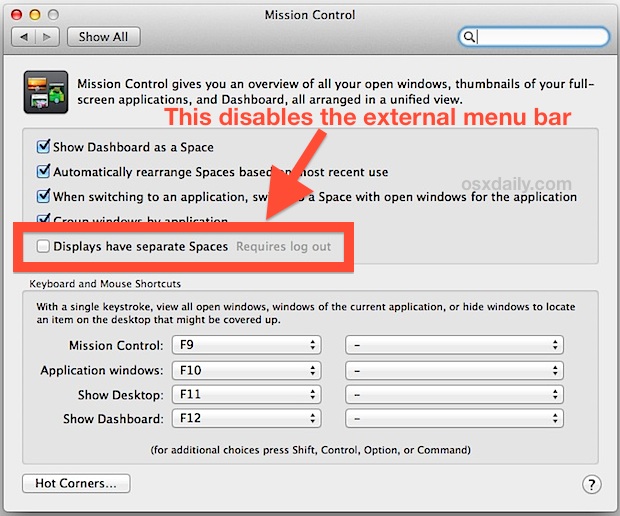
Note: if you toggle this off you may wish to set the primary display again to indicate which screen you want the Mac menu bar and Dock to appear on. The primary display also becomes where new windows and alert dialogs appear by default.
Toggling “Displays have separate spaces” to OFF does not play well with full-screen app mode, thus if you like how Mavericks handles full screen apps on multiple displays, you will not want to turn this feature off. That’s a fairly significant side effect and it’s important to understand that this basically causes OS X Mavericks multi-display behavior to be like that of OS X Mountain Lion and other prior versions of Mac OS X. Yes, the secondary display is still entirely usable, so long as full screen apps are not used, since full screen apps become the “Spaces” this setting adjusts. Ideally, an update to OS X will separate the menu bar setting from the Spaces setting, into an optional and unrelated adjustment somewhere in Display preferences, similar to how you can indicate which display the menu bar shows up on.
There may be a defaults setting that can toggle the brightness and/or menu bar options separately, similar to how you can make terminal windows focus follow the mouse cursor, but we have not yet found it or been made aware of such a trick. If you know of one, send us an email, tweet, or post it on our Facebook or Google+ pages.
How do I Show the External Displays Menu Bar?
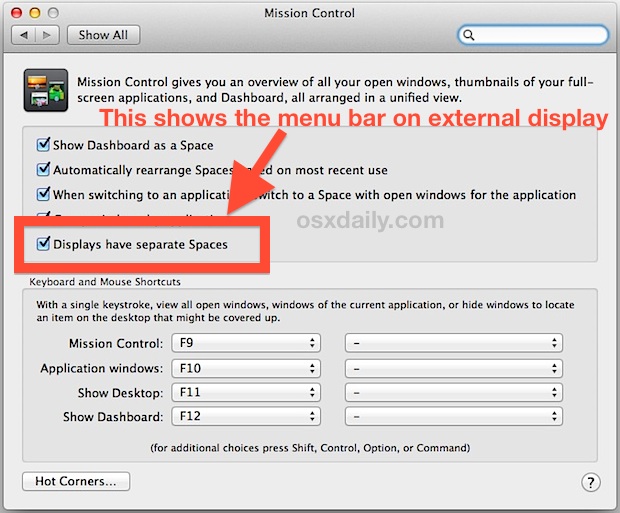
Some users may have turned off the external display menu bar inadvertently, since the wording of the setting does not offer any description of its effect on the menu bar displaying on secondary or primary monitors. To show the menu bar, you simply need to reverse the checkbox toggle for “Displays have separate Spaces” within the Mission Control preference panel, then log out and back in again. This will re-enable the menu bar on the secondary external display, returning back to its default behavior in OS X 10.9, and it will also provide the dim/bright menu bar focus indicator again, depending on where the mouse focus is.
Thanks to @scottperezfox for the tip inspiration, don’t forget to follow us on Twitterif you haven’t done so yet.
By Paul Horowitz - Mac OS X, Tips & Tricks - Leave a Comment
How to Clean Install OS X Mavericks
Oct 26, 2013 - Leave a Comment
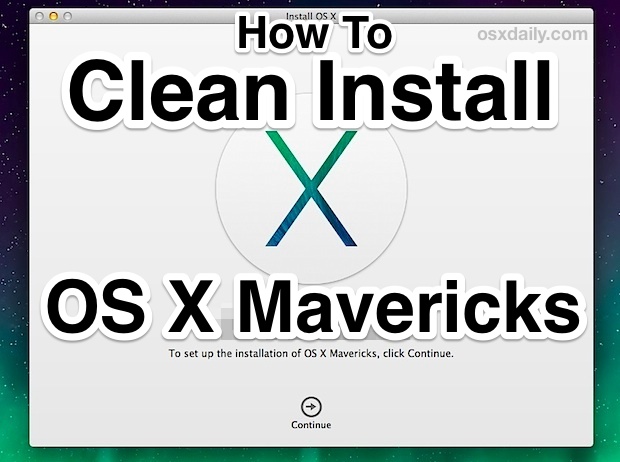
The default solution for installing OS X Mavericks is to download it free from the App Store and then perform an upgrade from a previous version of Mac OS X, whether that’s from Mountain Lion or Snow Leopard. Upgrades are fast, efficient, and most important, very easy, and that’s the recommended option for the vast majority of Mac users. Nonetheless, some users may want to start fresh with a blank slate, using what’s known as a “clean install” and that’s what we’re going to cover here. Performing a clean install can be desirable for a variety of reasons, from ditching years of built-up cruft on older Macs from many years of OS X upgrades, to troubleshooting difficult issues, to transferring ownership of a Mac to a new owner.
The process of a clean install is not difficult if you follow these instructions, but because it involves formatting the Macs hard drive, it can result in extra work. Since the Mac will start with a clean slate, all apps must be downloaded and installed again, important documents and personal data must be manually transferred back over from backups, and system settings must be customized again. This typically makes it more appropriate for advanced users or for select situations (like selling a Mac), and thus it should not be considered a standard upgrade path to get to OS X 10.9 Mavericks.
Warning: Performing a format and clean install of OS X will erase the Macs hard driveand all contents on the drive will be removed. All files, applications, documents, photos, customizations, everything on the computer will be lost in this process. Understand this and know what you are doing, and why, to prevent data loss of critical files. We can not reiterate this enough.
How to Format & Clean Install OS X Mavericks on a Mac
You will need a bootable OS X 10.9 installer drive to accomplish a clean Mavericks install using this method. You can learn how to easily create one here if you haven’t done so yet.
- Back up the Mac first with Time Machine or by manually backing up your important data – do not skip this step or else you will not be able to recover files
- Connect the bootable OS X Mavericks installer drive to the Mac and reboot the computer
- Hold down the OPTION key during boot until you see the boot selector menu, then choose “Install OS X Mavericks”
- At the “OS X Utilities” screen, choose “Disk Utility”
- Select the hard drive or partition to format from the left menu, then choose the “Erase” tab
- Select format type “Mac OS Extended (Journaled)”, give it a logical name (like Macintosh HD), and choose “Erase”, confirm to erase at the next screen
- When finished erasing the disk, quit out of Disk Utility to return to the normal boot menu
- From the “OS X Utilities” menu, now choose “Install OS X”, click “Continue” and agree to the terms of service, and select the freshly formatted “Macintosh HD” drive to begin the clean install process
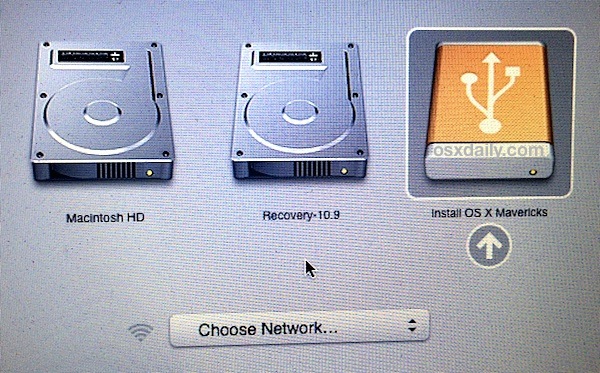
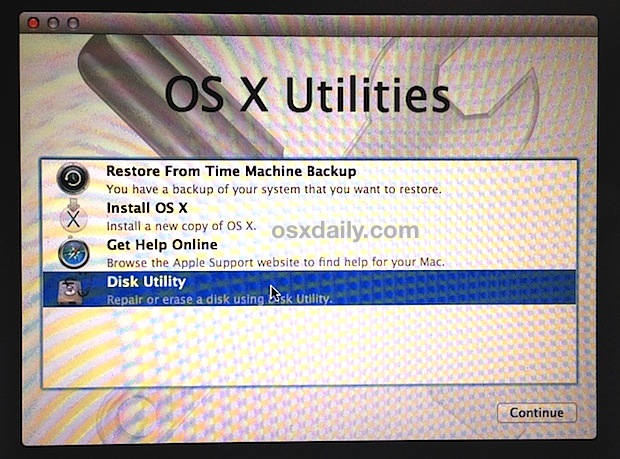
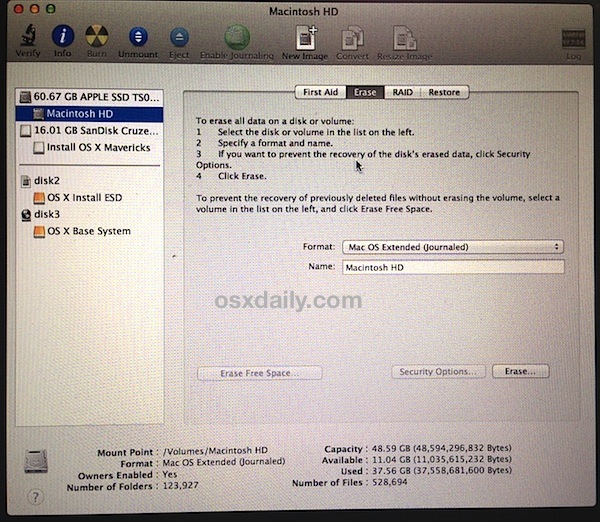
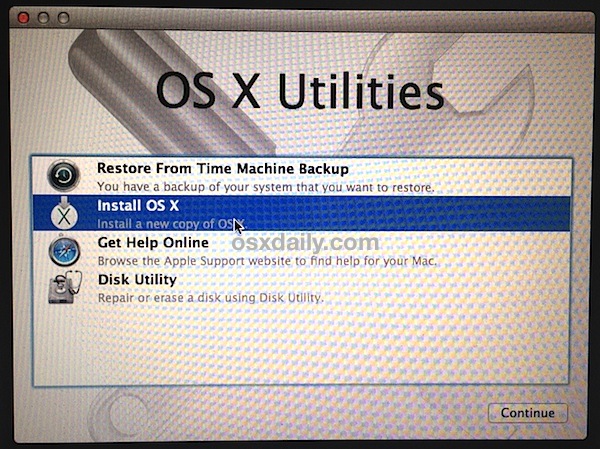
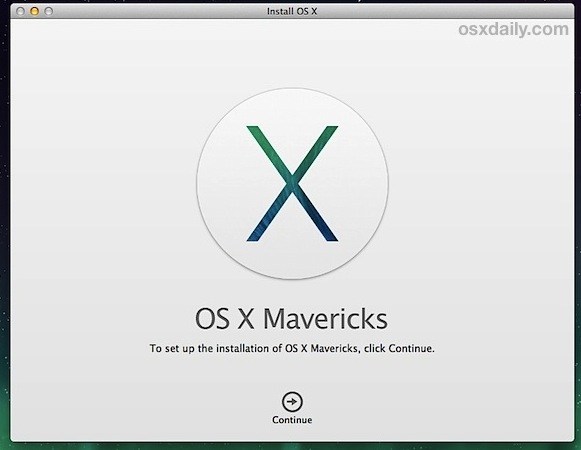
(Excuse the unusual picture quality, some images taken with an iPhone 5 during the boot install process where screen shots are not allowed)
A clean installation of OS X Mavericks takes about 35-45 minutes to complete, depending on the speed of the install drive and the volume OS X is being installed onto. When Mavericks is finished installing, the Mac will reboot itself automatically and go through the initial setup process for OS X Mavericks. Register, create a user login, set the Apple ID and iCloud details, and you’re all done. You’ll boot directly to a very blank OS X installation, similar to the experience of getting a brand new Mac.
A fresh OS X installation is very bare with just about nothing included outside of the core system and basic Mac apps (intentionally so), thus any custom applications or apps you had previously downloaded from the web or App Store will need to be downloaded and installed again. For apps from the Mac App Store, that’s fairly easy, but for third party apps you will need to access them independently through the developers.
If you are keeping the Mac yourself, you will probably want to transfer your old data, documents, photos, and files back onto the Mac. This is a good time to access Time Machine to selectively restore certain files, or access backups made to network drives, DropBox, CrashPlan, external backup drives, USB flash disks, whatever your preferred backup method is and from where ever stored your data.
If you’re new to Mavericks, don’t miss these simple tips to get you started with some of the great new features.
By Paul Horowitz - Mac OS X, Tips & Tricks - Leave a Comment
Search the Web & Wikipedia from the iOS Home Screen with Spotlight
Oct 26, 2013 - Leave a Comment
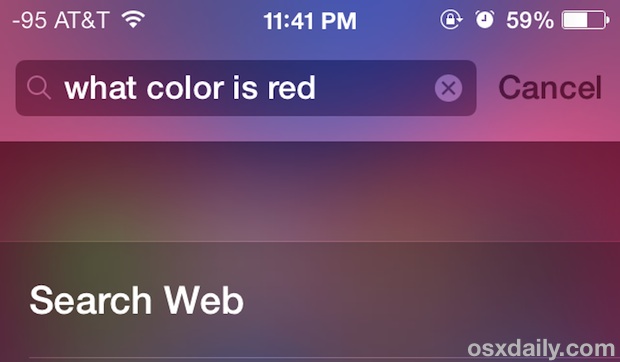
Want to quickly search the web or Wikipedia from the Home Screen of iOS? Just turn to Spotlight, the built-in search engine. Sure, Spotlight is often used as an application launcher or a way to quickly find old emails, notes, and contacts, but you can also type more generic queries into it the search box to immediately search either the web or Wikipedia. It’s super easy to use and very fast:
- From the iOS Home Screen, tap, hold, and pull down on any icon to summon Spotlight
- Enter the query, phrase, or word to search the web for
- Tap “Search the web” to instantly launch a web search into Safari, or tap “Search Wikipedia” to open Safari with a Wikipedia search

You’ll notice that search queries that match phrases or things currently stored on the iPhone or iPad will provide the local device items first, so to search the web for something more generic like “Phone” or “email” you would need to enter those phrases into Spotlight, then swipe down to scroll to the bottom of the Spotlight results and choose the “Search the web” option from there. Queries and phrases that do not match anything stored on the iOS device will immediately show the two external Web and Wikipedia search options.
The search engine used by Spotlight and passed to Safari is the same that is set in your default search settings. That’s usually Google by default, but you can also select Yahoo or Bing if you’d prefer either of those by going to Settings > Safari > General > Search Engine. You can not change the web browser from Safari, however.
You’ll notice that Wikipedia Search won’t always turn up a unique document for each term, and may find various listings with the term nicluded instead. Using the on-page search trick for Safari can quickly help narrow down what you’re looking for in those situations.
This feature was around in previous versions of iOS, briefly disappeared from iOS 7.0 to 7.0.2, and reappeared again from 7.0.3 onward. If you don’t find the option on your iPhone, iPad, or iPod touch, you probably just need to update to the latest version of iOS.
By Paul Horowitz - iPad, iPhone, Tips & Tricks - Leave a Comment
Turn Off “My Photo Stream” to Free Up 1GB+ of Space in iOS
Oct 25, 2013 - Leave a Comment
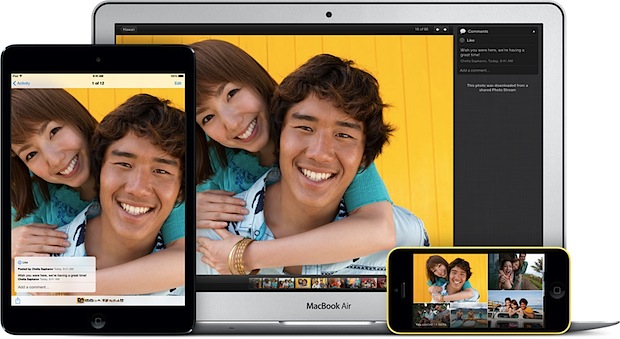
Photo Stream is undoubtedly a useful part of iCloud for those with multiple iOS devices, but it has a feature that often goes unused which may be wasting your preciously small iOS device capacity. This love-or-hate feature is the “My Photo Stream” album, it’s enabled by default and intends to automatically sync your most recent 1000 photos between your iOS devices, or to a Mac with iPhoto. Sounds great, right? It is, if you have a handful of devices and want those recent photos automatically syncing between your iPhone, iPad, and Mac. In these multi-device situations, you’ll be smiling like the Apple promo image of the feature as it seamlessly is syncing your pictures back and forth:
Tiada ulasan:
Catat Ulasan